How to add or edit a DNS record in Plesk

Managing DNS sounds like a difficult task, but don’t worry! Once you’re able to get through the highly technical sounding terminology, it’s actually pretty straightforward. I often say that DNS is a bit like an onion: There’s many layers to it, and it’s very likely that you’ll cry if you try to get through them all. We’ll get you through the trickier layers with this guide 🙂
DNS at its simplest is a list of records that specify domain name X (and optionally some of its subdomains) points to an IP address, like: 1.2.3.4. Each domain could have just a couple or many DNS records.
This guide will help you recognize the different types of records, what they’re used for and how to configure your DNS records in Plesk. This includes updating, adding, or removing DNS records for your domain in Plesk.
Important: due to the manner in which the global DNS system works, any changes made to your domain’s DNS records can take up to 48 hours to complete, though often the changes are visible within just a few hours. Please be patient! You can check the global progress here.
How to find your DNS settings
Tip: If your domain is registered with us and you have explicitly chosen the option to “Manage my DNS records manually,” then your DNS hosting is managed within our Client Centre and not within Plesk and you should use this guide to managing your DNS records instead. If you’re not sure, check the settings for the domain in the Client Centre: if the option “Manage my DNS records manually” is selected, click the above link to proceed.
- First, we’ll need to log in to Plesk, after which we’ll be taken to the Websites and Domains screen.
- Select the domain you wish to adjust DNS records for
- Choose the “Hosting & DNS” tab
- Click on the DNS (or DNS Settings) button.
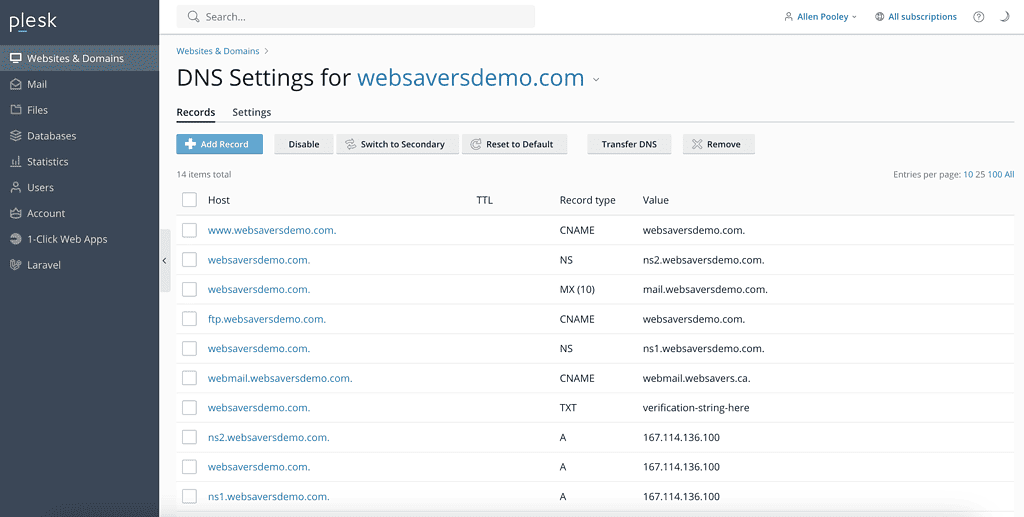
You’ll now be looking at your domain’s DNS records.
There’s a number of options on this page and most of them affect your entire set of DNS records. Only Add and Remove will affect individual records. To edit a DNS record, click on the blue text in the “Host” column.
- Add Record: use this to add a new DNS record. (Details below, as well as on how to edit existing records)
- Disable: (Warning: does not disable individual DNS records) This disables the entire DNS system for your domain. You only want to use this option if your DNS will be hosted with another provider.
- Switch to Secondary/Primary: ignore this. It’s for using multiple DNS systems at the same time (not common).
- Reset to Default / Apply DNS Template: ignore these. You only want to do this if you know none of your customized records are to be utilized any longer.
- Transfer DNS: used to import DNS records either from a file (if you have one, the list is more complete) or via live records lookup (could miss some records).
- Remove: select one or more records in the list and use this button if you wish to delete them. Note: you will be presented with the option to finalize your changes. Make sure you do this or the alterations will not take effect.
If you only see NS records in the list and no others it’s probably because your DNS is disabled. The first button on the left will be “Enable” – click this to re-enable DNS management in Plesk. You’ll still need the domain’s name servers to point to your hosting plan.
Always check to see if a record exists already with the same subdomain and type (ex: A, TXT, CNAME, MX, etc). If one does exist already with the identical Subdomain/Host entry and Type, it’s highly likely that you need to edit the existing record and not create a new one.
The many names for the Host / Domain Name / Name field
In the list of records, Plesk calls it the Host field. Sometimes this field will be called the Domain, Domain Name, or Name field. These are all the same. But you have to look closely and be smart about what you enter here. If Plesk shows your domain name after it, and you’re being asked to also *enter* the domain name in the field, then the end result will be: sub.<domain>.<domain>, when it’s quite likely intended to just be sub.<domain>.
How subdomains work with the Host field
When adding or editing a DNS record in Plesk, the Host field automatically uses the domain name; in the screenshot above that’s websaversdemo.com. You only need to fill in the Host field if you’re utilizing a subdomain. For example, with the subdomain xyz.websaversdemo.com, you would enter simply ‘xyz’ because Plesk will automatically add the .websaversdemo.com to it. An example of this in the screenshot above is ftp.websaversdemo.com where ‘ftp’ is the entered subdomain/host. If the record you’re adding or editing does not use a subdomain, leave the Host field blank.
If you *are* setting up a subdomain DNS record and it will be hosted externally then add the DNS record under the parent domain (yes, you can create subdomain records there too). Do not use the ‘Add a Subdomain’ button under Websites & Domains in Plesk, as that sets up local web and email hosting for the subdomain – probably functionality you do not need. For example, if you want to set up shop.yourdomain.com to point to an external cart or store, go to the DNS settings for yourdomain.com and there you will create the DNS records required by the store provider. Read more on how to use an external website provider.
Identifying Common DNS Records
If you’re not sure which records you should be editing, this list will help you to understand and find the correct records for each type of hosting service:
DNS Records for the website
This is what is called your root DNS record which controls where visitors are sent when they’re accessing your domain like mydomain.com. This is a record of type A where the Host column shows only your domain (with a period after it; they all have that) and not a subdomain like mail or ns1 or ftp. There is also typically a CNAME record for www.mydomain.com which points to mydomain.com. Warning: keep an eye out for when *other* records (like mail records) are CNAME’s that point to your root record, as that means changing your root record will change them too.
DNS Records for Inbound Mail
This is controlled by MX records, but it technically has two components:
- A record of type MX with no subdomain in the Host column and which points to another record in the list like mail.mydomain.com.
- The record that the MX record points to, like mail.mydomain.com. Look for that record with the mail subdomain. It *should* be an A record that points to the IP of the mail server. Tip: if it’s a CNAME that points to your root record (@, or mydomain.com) and you’ll be changing your root record, then you’ll want to remove this record, and add it as an A record before you make the root record change.
DNS Records for Mail IMAP/POP/SMTP
This differs in other configurations, but for Plesk typically mail.mydomain.com is dual-purposed for both MX and IMAP/POP/SMTP, meaning it’s the same server as your Inbound Mail (MX) server.
Ultimately this isn’t important since we direct you to use our server hostname when connecting with your mail apps anyway – in such a configuration, this record is not actually utilized for anything other than MX.
Removing a DNS Record
To remove a record, simply check the box beside the ones you wish to remove and click the Remove button. After doing so, you will be presented with the option to finalize your changes — make sure you do this or the alterations will not take effect.
Adding or Editing a DNS Record
To edit a DNS record, click on its “Host” field (the blue text) and you will see a page similar to the one below.
To add a new DNS entry, click the “Add Record” button and you’ll be taken to the following page:
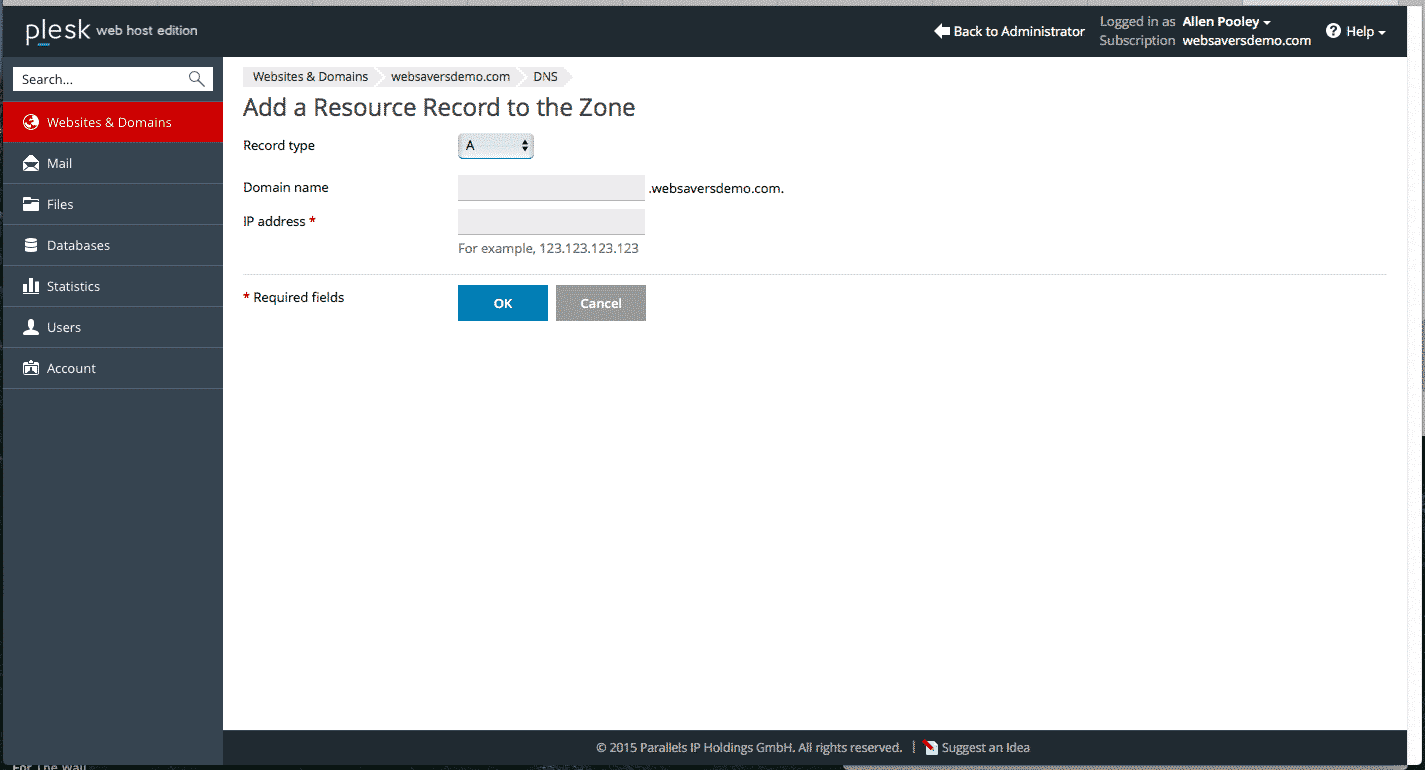
There is a “Record type” drop-down which allows you to select the type of DNS entry to add.
If you’re adding or editing a ‘root’ DNS record (on other DNS management systems this is often shown as ‘@’ or just your domain), in Plesk this means to simply leave the Domain name (subdomain) field blank.
As described above, if you only see “NS” or “Name Server” in the list of record types, your DNS is disabled and you must go back and click the button to enable your DNS. See above under the “How to find your DNS settings in Plesk” heading for more info.
Select the type of record below to see the individual processes in more detail:
A records
The “A” record is the most common type of record for DNS – it links a domain name (or subdomain) to an IPv4 Address. An IPv4 address is the 12-digit number you often see when dealing with websites or even your own home network. It is in the format: xxx.xxx.xxx.xxx
When adding an A record there are two input boxes; the subdomain and the IP address. If you input “testing” in the subdomain box, and a corresponding IP address in the IP address box, you will have created a subdomain “testing.yourdomain.com” pointing at that IP address. Enter the information and click “OK”.

AAAA records
This process is the exact same as above, however the “AAAA” indicates that it is an IPv6 address. These addresses appear in the following example format: 2002:7b7b:7b7b::1
CNAME records
A CNAME (or Canonical Name) record is an alias. When a website visitor’s browser or mail user’s app looks up the entered subdomain, the DNS system will respond by indicating that the IP address for the subdomain is the same as whatever target you enter here.
The most common use for a CNAME record is to indicate that the www subdomain shares the same IP address as the root domain record. For example www.websavers.ca is hosted on the same IP as websavers.ca. Note that this doesn’t mean it will forward all requests for www.websavers.ca to websavers.ca — this action is up to the web server! See here to learn how to set your preferred domain.
Enter the subdomain (or leave blank to apply a CNAME for the root domain itself) and put the target for the alias in the “Canonical domain” field.
MX records
The MX (Mail eXchange) record is incredibly important if you’re using mail with your domain. This record tells sending email servers where to route mail for email addresses that use your domain (ex: contact@yourdomain.com). In our default setup it is pointed to mail.yourdomain.com, which in turn points to the local server’s IP. This will need to be changed if you are using an external email service.
The MX DNS screen has three fields:
- The domain (or more specifically the field references a subdomain) to receive mail for.
- This should be left blank/empty to configure mail on the primary domain. You would only enter a subdomain if you want to receive mail for accounts like me@sub.mydomain.com — most people do not want this.
- The destination mail server.
- In our cases, this is mail.yourdomain.com
- This value must not be an IP, instead it should be an A or CNAME record. For example, if your mail server is at 1.2.3.4, then you would create an A record like mail.yourdomain.com and point that to 1.2.3.4, then set your MX record destination to be mail.yourdomain.com
- The priority of the mail exchange server.
MX Priorities
Priority is an entirely new concept that doesn’t exist with the other record types above; it’s used in the case of having backup mail servers – as you would if you used Google Apps for Business. It basically says “Send mail here, if it fails there, try this one. If that fails, try this one.” If you’re configuring a MX, the instructions you’re following should also give you examples of what the priorities should be.
If you’re mirroring/copying your MX records from another DNS host and the priority numbers they use are different from what’s available in Plesk, just pick the closest numbers available. The specific number is irrelevant: only the order matters. Lower numbers mean higher priority and therefore the first entry to pick when delivering mail. If that server doesn’t respond it will move on to the next lowest number in sequence.
Note: MX records should not be configured to point to IP addresses directly. It must be three levels such that your MX record points to an A record that points to the mail server IP. External mail providers already have the A records configured on their end, so you only need to create the MX records that point to their provided A records.
PTR record
This section is woefully blank as PTR records do not work with our setup; if you have a dedicated IP address with Websavers and want a rDNS configured, please reach out to us directly.
TXT record (also SPF Record)
The TXT Record is one of the most commonly edited records for new webmasters. Why is this? Because it’s invaluable for verifying domain ownership for companies such as Google, Microsoft, GoDaddy, and other online service providers.
It’s also the type of DNS record used to publish SPF records, which is an excellent method of curbing email forgery. Read more about how SPF works here.
In most cases you do not require to have an entry for the domain portion of this; Google, for example, wants this section left blank. In the TXT field, the second field on the screen, you enter the verification string provided to you.
SRV records
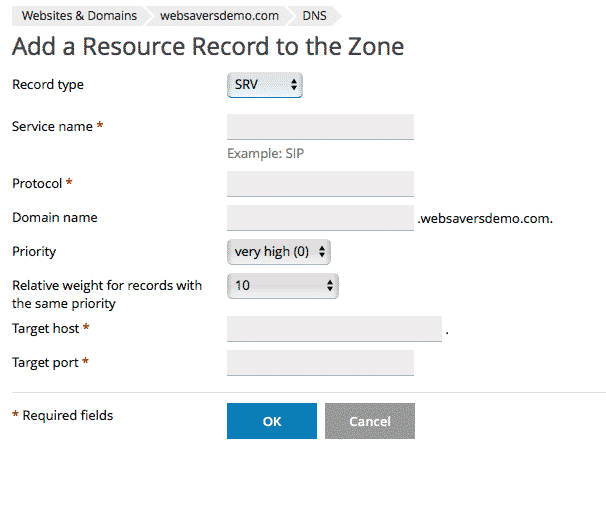
This is the SRV screen. It is the most daunting of all the DNS entries, and is generally only needed for advanced users. If you’re setting up an auto discover service for Office 365, or Skype for Business, or another service that requires a SRV record: Don’t panic! It’s not quite as bad as you may think.
Often, a SRV record is displayed in one long string like this example:
_sip._tls.sipdir.online.lync.com
When adding it to Plesk we need to break it into its separate components:
- Service name: sip
- Protocol name: tls
- Domain name: leave blank (this is used to add it to a subdomain, which is quite rare)
- Target host: sipdir.online.lync.com
- Target port: 443
Here’s an example of an autodiscover SRV record:
_autodiscover._tcp.yourdomain.com priority 100, weight 1, port 443, yourdomain.autodiscover.outlook.com
When adding it to Plesk we get these components:
- Service name: autodiscover
- Protocol name: tcp
- Domain: (leave blank)
- Priority: 100 (Plesk maxes out at 50, go ahead and use 50)
- Weight: 5 (Plesk goes from 0 to 5 before increasing further)
- Target port: 443
- Target host: yourdomain.autodiscover.outlook.com
With this information, a mail client – for example – trying to auto detect settings, checks out your domain, it will see that for an “autodiscover” request, it should connect to yourdomain.autodiscover.outlook.com on port 443 to get the information – pretty clever!
Troubleshooting
Problem: When adding a subdomain record Plesk says “This record will conflict with the glue record for the zone.” This occurs when you have added the subdomain to Plesk for hosting purposes, but all you really need to do is create a single DNS record for the subdomain. When you go to add the new record, it conflicts with the existing records that Plesk has created for you.
Solution: This subdomain will show up like any other domain under Websites and Domains: remove it from there. Then go to the DNS settings for the parent domain and add your record.
This article was originally published in July 2016 and receives frequent updates.
Posted in Client Centre & Plesk
About Websavers
Websavers provides web services like Canadian WordPress Hosting and VPS Hosting to customers all over the globe, from hometown Halifax, CA to Auckland, NZ.
If this article helped you, our web services surely will as well! We might just be the perfect fit for you.
Great thanks for sharing. Here is one tip, as an alternative to whatsmydns.net, you can rely on https://dnschecker.org/ for more detailed propagation results, with over 100+ public servers available to check the live propagation results. More to that, you can also add your custom DNS server.
Thanks Tegan; we have used both before with great success. I’ve approved this comment so others can benefit from this info as well 🙂
Nice article which solved a simple, but critical and infuriating problem.
I was trying to add a couple of SRV records for Office 365 Business at my host using Plesk.
I couldn’t use the Office 365 automatic DNS management because I use subdomains and you have to manage your own DNS settings to be able to do so.
Microsoft ask you to add two records, _sip and _sipfederationtls. However, Plesk adds the underscores automatically so you end up with __sip and __sipfederationtls, so the answer is use sip and sipfederationtls and all is well.
That was one of those can’t see the wood for the trees, I’m a dev not a sys admin, desk-head-banging periods.
Your article helped me see what was staring me in the face.
Thanks.
Believe me, I understand that pain! Glad the article could help 🙂