How to manage DNS records or domain forwarding at registrar level

This guide will walk you through everything necessary to managing your DNS records at the registrar level. Because we consider registrar level DNS management an advanced function, we’ll be expecting you to have a basic knowledge of how DNS works.
This guide will only work for you if your domain is registered with us and you have the option “Manage my DNS records manually” enabled for the domain within your Websavers account. If, instead, you have the option “Manage my DNS records using my hosting plan or VPS” enabled, follow this guide to managing your DNS records with Plesk instead. If your domain is registered elsewhere the general principles here will still apply, but we cannot help you if you get stuck: click here to transfer your domain to Websavers.
DNS at its simplest is a list of records that specify domain name X (and optionally some of its subdomains) points to an IP address, like: 1.2.3.4. You’ll likely encounter records of type A the most; their primary use is to point your domain to where its website is hosted. Each domain could have just a couple or many DNS records.
This guide will help you recognize the different types of records, what they’re used for and how to configure your DNS records in our Client Centre. This includes updating, adding, or removing DNS records for your domain. It also includes creating a domain forward.
Important: due to the manner in which the global DNS system works, any changes made to your domain’s DNS records can take up to 48 hours to complete, though often the changes are visible within just a few hours. Please be patient! You can check the global progress here, but it may not yet correlate with your own local DNS.
How to find your DNS settings
- Login to the Client Centre and select Registered Domains from the main menu
- Select the domain for which you wish to use registrar level DNS from the list
- If you have already activated DNS management for your domain, skip to step 6, otherwise continue with (4)
- Under the Name Servers & DNS section, select the second option: “Manage my DNS records manually using the DNS Management controls provided below” and click Save Changes. If this option is already selected, move on to step 5.
- Scroll down and you’ll now see the “DNS Host Record Management” section. Select the “Activate” button to activate free registrar level DNS management.
- Scroll down to “DNS Host Record Management” again and click the “Manage” button to manage your DNS records.
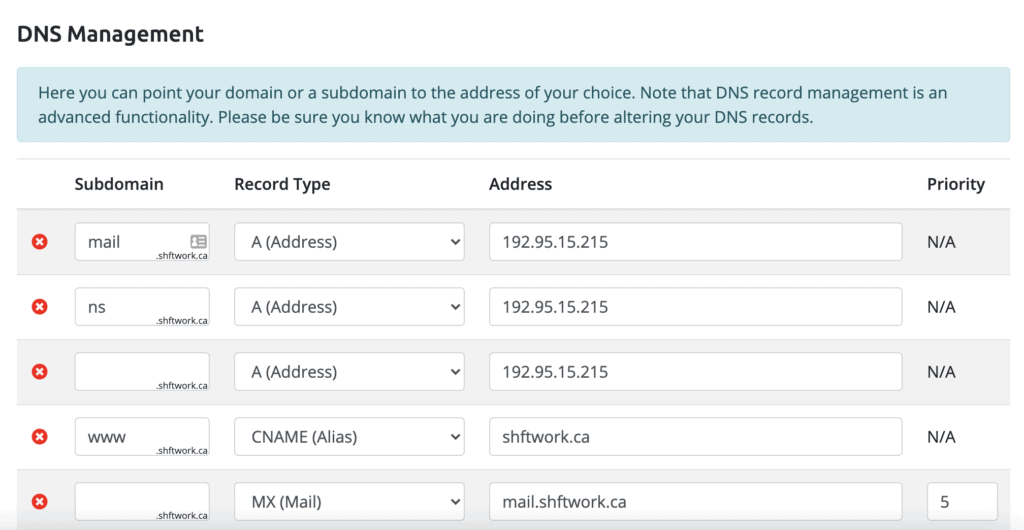
Here you will see the registrar-level DNS Management interface. It will list your existing records and provide the option to add a new one at the bottom in the green box.
If you have been told to add or create a DNS record, read these tips:
- When adding or editing a DNS record, you only need to fill in the Subdomain field if you’re adding a record specifically for a subdomain. For example, if you explicitly want to use the subdomain xyz.websaversdemo.com, you would enter simply ‘xyz’. If you’re not adding a record that applies to a sub domain leave that field blank.
- Add or Edit Existing? Always check to see if a record exists already with the same type and subdomain. It must be both, otherwise it’s not the same record. If it does exist already, you should edit the existing record(s) and not create a new one.
Identifying Common DNS Records
If you’re not sure which records you should be editing, this list will help you to understand and find the correct records for each type of hosting service. More details about how each type of record works can be found further into this article.
- DNS Records for Website Host: This is what is called your root DNS record which controls where visitors are sent when they’re accessing your domain like mydomain.com. This is a record of type A where the subdomain field is blank. There is also typically a CNAME record for www.mydomain.com which points to mydomain.com. Warning: keep an eye out for when *other* records (like mail records) are CNAMEs that point to your root record, as that means changing your root record will change them at the same time, which is often unintended.
- DNS Records for Inbound Mail: This is controlled by records of type MX with no subdomain because if there were a subdomain then the records would be controlling mail delivery to an_address@sub.mydomain.com and not an_address@domain.com. Sometimes there’s just one MX record and other times there’s multiples with various priority levels assigned.
- DNS Records for Mail IMAP/POP/SMTP Connections: This differs with various mail hosts. For example, with Exchange hosting you don’t need these at all, while with our Plesk hosting you typically will use mail.mydomain.com for all of these functions.
Removing a DNS Record
To remove a record, remove the subdomain and address values in that row and click the Save Changes button.
Adding or Editing a DNS Record
- To edit a DNS record, simply adjust the values you see then select the save button.
- To add a new DNS entry, fill out the fields in the last/empty row, then select the save button.
One of the fields is called Record type which allows you to select the type of DNS record. If you’re adding a ‘root’ DNS record (sometimes called ‘@’) this just means to leave the subdomain field blank.
Select the type of record below to see the individual processes in more detail:
A records
The “A” record is the most common type of record for DNS – it links a domain name (or subdomain) to an IPv4 Address. An IPv4 address is the 12-digit number you often see when dealing with websites or even your own home network. It is in the format: xxx.xxx.xxx.xxx
When adding an A record there are two input boxes; the subdomain and the IP address. If you input “testing” in the subdomain box, and a corresponding IP address in the IP address box, you will have created a subdomain “testing.yourdomain.com” pointing at that IP address. Enter the information and click “OK”.
AAAA records
This process is the exact same as above, however the “AAAA” indicates that it is an IPv6 address. These addresses appear in the following example format: 2002:7b7b:7b7b::1
CNAME records
A CNAME (or Canonical Name) record is an alias. When a website visitor’s browser or mail user’s app looks up the entered subdomain, the DNS system will respond by indicating that the IP address for the subdomain is the same as whatever target you enter here.
The most common use for a CNAME record is to indicate that the www subdomain shares the same IP address as the root domain record. For example www.websavers.ca is hosted on the same IP as websavers.ca. Note that this doesn’t mean it will forward all requests for www.websavers.ca to websavers.ca — this action is up to the web server and is handled at the web hosting level. For example, with our hosting, see here to learn how to set your preferred domain.
Enter the subdomain, or leave blank for the CNAME to apply to the root domain, and put the target for the alias in the address field.
MX records
The MX (Mail eXchange) record tells email servers where to send mail sent to your domain. With our shared hosting it is pointed to mail.yourdomain.com. This will likely need to be changed if you are using our Exchange hosting service, or using external email services, like Office 365 or Google Apps for Business for your email.
An MX record has three fields:
- The domain (or more specifically the field references a subdomain) to receive mail for.
- This should be left blank/empty to configure mail on the primary domain. You would only enter a subdomain if you want to receive mail for accounts like me@sub.mydomain.com — most people do not want this.
- The destination mail server.
- In our cases, this is mail.yourdomain.com
- This value must not be an IP, instead it should be an A or CNAME record. For example, if your mail server is at 1.2.3.4, then you would create an A record like mail.yourdomain.com and point that to 1.2.3.4, then set your MX record destination to be mail.yourdomain.com
- The priority of the mail exchange server.
Priority is used in the case of having backup mail servers. It basically says “Send mail here, if it fails there, try this one. If that fails, try this one.”
Lower numbers mean higher priority and therefore the first entry to pick when delivering mail. If that server doesn’t respond it will move on to the next lowest number in sequence.
The instructions provided by your mail provider will tell you what the priorities should be, but keep in mind that they don’t need to be exactly the same, they only need to follow the same numerical order.
PTR record
These are not managed from your DNS settings, but rather by the owner of the IP address. If you have VPS with us, you can manage your PTR (or rDNS) record in the Client Centre.
TXT record (also SPF Record)
The TXT Record is one of the most commonly edited records for new webmasters. Why is this? Because it’s invaluable for verifying domain ownership for companies such as Google, Microsoft, GoDaddy, and other online service providers.
It’s also the type of DNS record used to publish SPF records, which is an excellent method of curbing email forgery. Read more about how SPF works here.
Unless a subdomain is explicitly specified by whomever told you to create the TXT record, do not enter one.
SRV records
The SRV screen is the most daunting of all the DNS entries, and is generally only needed for advanced users. If you’re setting up an auto discover service for Office 365, or Skype for Business, or another service that requires a SRV record: Don’t panic! It’s not quite as bad as you may think.
Often, a SRV record is provided like this:
_sip._tls.sipdir.online.lync.com- Weight
1(if not provided use 1) - Port
443 - Priority
100(if not provided use 100)
When adding it here, we need to format it like this:
- Subdomain:
<service>.<protocol>(Example:_sip._tls) - Address:
<weight>:<port>:<target>(Example:1:443:sipdir.online.lync.com) - Priority:
100
Here’s an example of how to enter a Microsoft 365 autodiscover SRV record:
- Subdomain:
_autodiscover._tcp - Address:
1:443:yourdomain.autodiscover.outlook.com - Priority:
100
With this information, a mail client – for example – trying to auto detect settings, checks out your domain, it will see that for an “autodiscover” request, it should connect to yourdomain.autodiscover.outlook.com on port 443 to get the information – pretty clever!
URL Redirect
Simply enter the URL you wish to redirect to under the “Address” field. There is no subdomain field for this option.
Tip: there is a “URL Frame” option which is sometimes also called URL cloaking. It’s strongly recommended to not use this type of forwarding as it can result in duplicate content warnings from search engines and potentially poor rankings because of this.
Posted in Client Centre & Plesk
About Websavers
Websavers provides web services like Canadian WordPress Hosting and VPS Hosting to customers all over the globe, from hometown Halifax, CA to Auckland, NZ.
If this article helped you, our web services surely will as well! We might just be the perfect fit for you.
This article is super helpful! I always struggled with DNS records, but now I feel more confident managing them. Thanks for the clear instructions!
That’s great! Thanks for the feedback, Chad 🙂